
Dawid Batog

A blog/portfolio documenting each unit of my work
Unit 10 - Rigging for animation


Here are some examples of basic forward kinematic rigging. It is achieved by parenting and adjusting pivots of different objects in relation to their parent and then moving/rotating the objects whilst changing the frames.
One thing to note is that when modelling the object you cannot use the resize tool on the object level as it will disrupt the model later on whilst animating due to its values being altered however it is still possible to resize but one must first enter the sub-object level by selecting one of the vertices/edges/faces of the object.
Here are some IK (inverse-kinematics) basic animations. The way inverse-kinematic functions is similar to the parent/child relationship thats used in FK (forward kinematics) however instead of basing the movement off the highest point of the model IK instead bases the movement off the lowest point creating a very specific leg-like motion.
I've made a simple model to demonstrate IK, whilst making sure I do not resize the model at the object level as to not make the model distorted in the future.

The original set in which I will experiment with lighting

Experimenting with one spotlight

Same scene but this time different light intensities

different angle of camera and spotlight

experimenting with two spotlights of two different colours

area light experimentation with two different colours, low intensity

area light experimentation with three different colours, high intensity

this is what the render looks like with un-altered settings such as no light drop-off

this is what the render looks like when values like light drop-off is tweaked
 |  |  |
|---|---|---|
 |  |  |
 |  |  |
 |  |  |
Not Yet Written.
These are the inspirations for what I want my rigged mech to look like. It will be a somewhat mechanized but nimble spider with some sort of weapon, maybe a rocket launcher or a minigun, attached to it.
 |  |  |
|---|

 |  |
|---|
 |  |
|---|
 |  |
|---|

 |  |  |
|---|

I began to model the feet of the spider. The aesthetic of the model was for it to be very spiky and edgy and this was made possible by extruding the different vertices on the model itself.
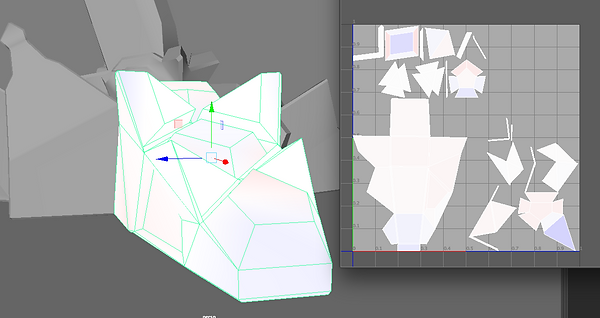
One big part of this modelling process is the fact that I wanted the model to be UV mapped in order to allow for better texturing later on. To create a good UV map one must 'unfold' the model onto a 2D plane in a way that allows easy access to all of the faces of the model. A good comparison to UV mapping is when people make a 3D object such as a cube in real life they first have to print out the cube flat on a 2D plane and then bend and contort it into a three-dimensional shape. This is the same process but backwards.
In order to know whether the UV map I've used is not stretched/contorted I've turned on the 'heatmap' on the UV map that allows me to see if any face of the model is out of place on the UV map itself. As you can see in the image on the right my whole model is white meaning that no face is wrongly placed/resized.
It was beginning to be very difficult to accurately UV map the spiky model that I've created and it was taking up too much of my time that I could've spent rigging the model and therefore I've decided to instead start a new, simpler model.
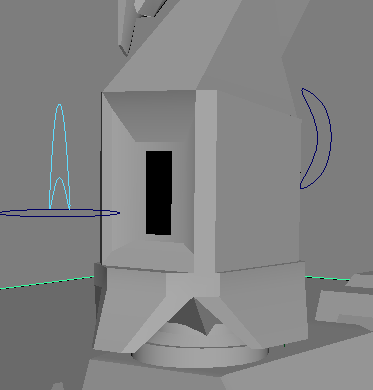
I began by modelling the leg of the model based on some of my research images. Whilst modelling I've been making sure I do not resize the model on the object-level as that would create distortions in the model later on when it came to animating it. Instead, to resize I've had to enter the sub-object level by selecting one of the vertices/faces/edges on the model before selecting all of it.
As before I've decided to UV map the model but because of the simpler shape it was much easier to unfold and layout the model on a 2D plane however I've ran into a problem. The problem being that if the model is parented to another model then the UV maps of both the models are overlayed on top of one another. This might cause issues if I was to texture the model using a software such as Substance Painter or Quixel as the way that kind of software works is that it overlays an image on the UV map and then it allows you to paint parts of the images onto the faces that you've previously laid out.
Instead of re-arranging the UV map I've decided to move on with the modelling process as once again I did not want the modelling to take up too much of my time when compared to the rigging.
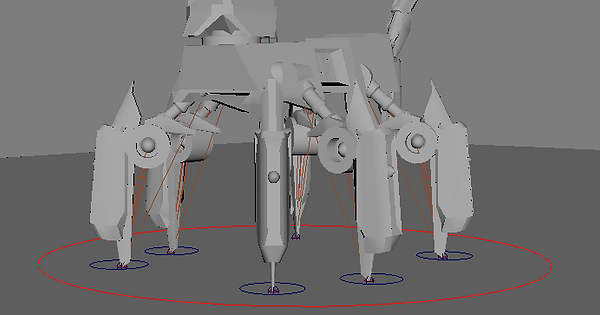
I've began rigging the legs of the spider model, I first created the joints necessary throughout the leg in order to make sure it moves correctly. I then created an IK handle which allowed me to move the joints in a realistic manner.
Once I had the joints rigged correctly I then had to parent the leg of the spider to the joints of the IK handle in order to make sure that every time I move the IK handle the leg also moves with it.
Once I've began to duplicate the legs I've ran into the problem of having to create an IK handle for each of the legs but that is to be expected as the IK handle bases its movement from its current position.
Another problem I've ran into is that when the legs were rotated the IK handle would rotate in unexpected ways and the leg was un-usable. I've had to create a locator for each one of the legs as that fixed the IK handle problem. I believe that the issue was created when rotating the leg as the IK handle no longer had a way of checking the object location based on its world location.
Overall I believe that my rig, whilst not too complex, was well created and easy to use. I've created a rig for the legs, the head and its rotation, the tail movement and the transformation of the mech into a makeshift flight/hover mode. Over the course of this Unit I've recognized that I will not have a great amount of time to create a very highly detailed model and therefore I opted for creating a more cartoonish model with a two-shade 'toon' renderer as that gave it a more toon look and allowed me to focus more on the rigging side of the Unit.
For the rig I've used several techniques such as Forward and Inverse kinematics in order to achieve different styles of movement. Where Inverse kinematics, that focus on moving the object from the lowest point, were used on the legs to achieve a more leg-like movement I've had to use Forward kinematics on the scorpion tail as the movement that was achievable when using IK with the tail was very limited and didn't look realistic. To make using FK easier with the scorpion tail I've created a ''key set drive'' that allows me to set the movement of the tail to a specific controller on the rig and make it easier for the user to move the tail without having to select several parts of the tail every time the user wants to move the tail. In order to achieve a more spider-like look for the mech I've had to rotate the legs and that made the IK handles glitch out and rotate unexpectedly and so I've had to create locators for each one of the legs and that fixed the problem as it made the IK handle once again be able to locate the objects orientation based on the projects 'world'.
If I were to improve this rig I would add many more features as the rig has only 6 different ways of moving it at the moment, them being: Head, Head Rotation Pivot, Tail, Legs, Hover Transformation and Whole Object. I would like to add some sort of weapon on the mech as so far it only has a scorpion tail. I would possibly add a gun of some sorts that came out from the model using a controller and 'set key drive'. I would also like to create an animation using the rig possibly whilst creating a whole environment using the two-shade renderer that was used to shade the model itself. Within the animation I would like to have the spider approach the scene in its 'hover' mode and then land, approach a box and then attack it using its scorpion tail or possibly the weapon I would like to add to the model.
I believe that this Unit has shown me just how difficult it can be to create a good rig whilst also creating a good enough model for the rig especially because when modelling for a rig one must always keep in mind that the model can not be resized and instead it has to be manipulated in the sub-object mode. A big problem with this unit was time management and how much time I could spend on each different section. In order to achieve my final goal I've had to cut out some features such as the UV Mapped textures I was originally going to texture my model with.
To make the tail move I experimented using both using both IK and FK handles, where IK did work to an extent it would make it so that if the tail would go over 180 degrees it will switch to the other side as IK always looks for the shortest possible way to reach the angle you want it to move to. FK worked very well as it created a smooth and realistic motion of what a scorpion tail would actually move like however it was tedious to go by selecting each section.
The solution was key set drives, this technique allows you to use a single controller to influence several object in a certain motion; in this case moving the controller backwards and forwards curls the tail up or down.
To make it even easier to handle I made restrictions to the controller so that it can only be moved on certain axis and only on a range, this makes sure that the controllers movement will always influence the tail and that the controller doesn't move too far away from the rig which will make it hard to control.
Key set drives aren't always the solution to moving multiple FK handles, they are the best when controlling a complex animation that will be used many times, making a key set drive for moving an arm is not ideal as you can get a lot more accurate results by manually moving the arm frame to frame.
I've created more set drives such as the mech's 'transformation' to flight mode where its legs go into a horizontal position.
This is a video that I've found online of a rig for a scorpion model. I've used this video to help me with several issues that I've had with my own rig and even gave me an idea of how to better rig the scorpion tail by using Forward Kinematics and not Inverse Kinematics.