
Dawid Batog

A blog/portfolio documenting each unit of my work
In order to introduce the software known as "Maya" I was tasked with creating a basic house.
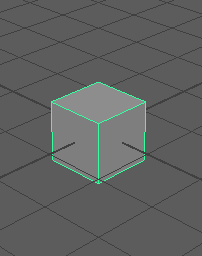
To begin I've created a simple cube by clicking on the "Polygon Cube“ icon under the "Polygons" tab. I then began shaping the cube by using the “Resize Tool” and “Move Tool”.
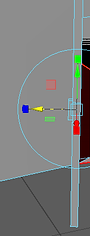
In order to select the individual faces, edges or vertices
In order to resize different individual parts of the model I must select individual faces, edges or vertices. To do so I must hold right-click which then brings up a mind-map looking menu that allows me to choose what the “Select Tool” highlights and selects.
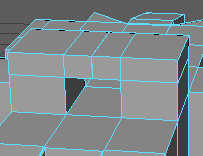
After creating a large 3D rectangle I then split the model into 2 subdivisions by clicking on “polyCube1” under the menu titled “INPUTS” that appears on the right of the screen and then writing in 2 in the “Subdivisions width” setting.
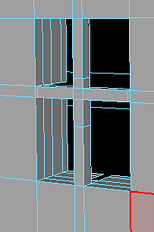
In order to create more faces on the model I began using the “Extrude” feature, which can be found under the “Edit Mesh” sub-menu. The “Extrude” feature can be used to extend or remove parts of the model without affecting the nearby faces, edges or vertices. This can be used to create bevels, In-dents or even passageways such as doors or windows.
To create the roof I’ve selected the middle edge of the sculpture and stretched it upwards using the “Move Tool”. I then used “Extrude” in order to I’ve the roof an overhang to make the roof more realistic. I then copied the model and created another smaller version in order to create what will be known as the garage.
In order to create more subdivisions I’ve use the “Insert Edge Loop” feature that is under the “Mesh Tools” sub-menu. I’ve added several subsections In the places that I decided to create the door and garage door. In order to create the in-dents that would be the passageways I used “Extrude” and created passageways. I then used the “Extrude” feature on the edges of both passageways in order to create the doors. To make the doors more authentic I’ve used the “Insert Edge Loop” feature to create more subdivisions in both doors and then I’ve used “Extrude” In order to shape door handles for both doors.
As this was my first attempt at using Maya I was mostly concerned with trying out features and not worrying so much about the quality of the model.
After modelling both doors I decided to create a window on the side of the ‘House’. I first started by adding more subdivisions to the side by using “Insert Edge Loop” and then began to create the bevel using “Extrude”. To add more detail to the window I wanted to give it a cross-frame. To do so I’ve used “Insert Edge Loop” on the 4 faces created by “extrude” located within the bevel of the window. I then once again used “Extrude” in order to bring out the cross shape and join all 4 faces together.
I’ve decided that this is how far I am going to push the model as the “wireframe” of the model began to be very crowded and messy.
In order for the model to have a shadow I've created a very thin plane and stretched it out below the 'House' in order to simulate a floor.
To present the model I've rendered it using the "Mental Ray" engine and I've also uploaded the model to "Sketchfab".


UNIT 4 - Introduction to materials, processes and techical skills in art and design


Creating the basic shape:
To begin, I’ve once again created a simple cube shape by using the “Polygon Cube” tool. I then began shaping the cube using the “Resize Tool” and “Move Tool”. After creating a shape I was happy with I then subdivided the width by 3 and the depth by 5.
To begin modelling the wings I’ve used “Extrude” on the faces that are positioned on the sides. I then used “Insert Edge Loop” in order to create more faces on the new “Extrusions” that I’ve made. I then once again used “Extrude” in order to create a 90° angle
This time I’ve been tasked with creating a spaceship model in Maya.


Modelling the 'boosters' :
I started working on the first set of boosters that would be placed below the wings. By “Extruding” the same face several times I was able to create a right angle and then “Extrude” it inwards to create a bevel.
I decided that another set of boosters would be placed on the back of the spaceship. This time I’ve only “Extruded” one face forward and at the same time I’ve changed the size to be smaller. I then once again created a bevel by “Extruding” into the model. The polygons of the bevel were very thin so I’ve selected all of the boosters’ faces and “Extruded” them very slightly to make them a bit thicker.
To add another set of boosters on the wings I first "Extruded" the wing downwards and then using "Extrude" on the face the booster would be on I pulled the face out and then "Extruded" it back in to create a bevel.


Working on the nose:
At first I've extruded the 'nose' of the ship forward leaving a gap in the middle however I did not like the aesthetic of the ship so I've then made the 'nose' of the ship shorter by using "Extrude" on the vertices and dragging them backwards creating two right-angle shapes.
I wanted to add something to the front of the ship so I used the extrude tool on the right-angle faces that were positioned at the front. I "Extruded" them outwards and then "Extruded" them once again to make them more sharp.
I was not happy with how this has turned out so I've reverted the changes and chose to create something else.
I decided to "Extrude" the faces beside the right-angle triangles creating two 90° angles coming off each side.
I chose to connect the two 90°angles, that I've "Extruded" earlier, to the wings and then I chose to "Extrude" two spikes coming out of the 90° angles. To create the spike I made sure to "Extrude" outwards and change the size of the "Extrusion".


Modelling the cockpit :
To create a cockpit I've began by selecting two faces on the top of the spaceship. I then "Extruded" them upwards and connected the two extrusions by extruding the new faces created. By constantly "Extruding" the faces I was able to create a shape I was satisfied with.
I wanted to create an arc on the top of the cockpit so in order to do that I had to constantly "Extrude" whilst changing the angle of the "Extrusion".
I had trouble connecting the arc together and I realise now that I could've used the "Bridge" function to join the two faces together perfectly, however in this instance I used "Extrude" to connect the two arcs together.
I chose to connect the two 90°angles, that I've "Extruded" earlier, to the wings and then I chose to "Extrude" two spikes coming out of the 90° angles. To create the spike I made sure to "Extrude" outwards and change the size of the "Extrusion".


Rendering:
In order to render the spaceship as well as possible I've used the settings shown below. I've used the rendering engine called "Mental Ray" and I've made sure to create a "Physical Sun and Sky" to create a more real feeling.
I also had the option of rendering the spaceship more smoothly by pressing 2 in the model preview. To make sure the smoothened model came out correctly I had to create more polygons by using the "Insert Edge Loop" function.
The rendered images feature both normal and smoothened versions of the ship.
I've also uploaded the model onto the hosting website named "Sketchfab"


The settings I've used for rendering are mostly default. I chose the render engine 'mental ray' as it provides more detail than maya's default engines.
I did not need to worry about the frame settings as my rendition was not an animation and therefore there is only one frame for the program to render.
I've made sure the render is saved into the folder that I've created the project in as this allows me and maya to quickly access all beneficial files without having to look for them
By uploading the model onto http://sketchfab.com I can showcase the model from all angles without having to render each individual scene. Without rendering some of the detail is lost however doing this also allows me to showcase the wireframe of the model, something which is not possible to showcase when the image is rendered.

In order to create shading in the renders I've selected the setting called "Physical Sun and Sky" and clicked 'Create'.
This allowed me to simulate a sun and sky that would create a backdrop that would allow the spaceship to cast a shadow.
In order for the spaceship's shadow to be visible I needed to add a 'plane' below the spaceship to simulate a simple floor.
The rest of the settings I've left default as they would change my render unnecessarily.
For my final task I've been asked to create a 3D setting of NYC rooftops which would be later used to create a real-time enviroment in Unity. First I had to research different images online that represent the feel of NYC.
Research In Gaming:
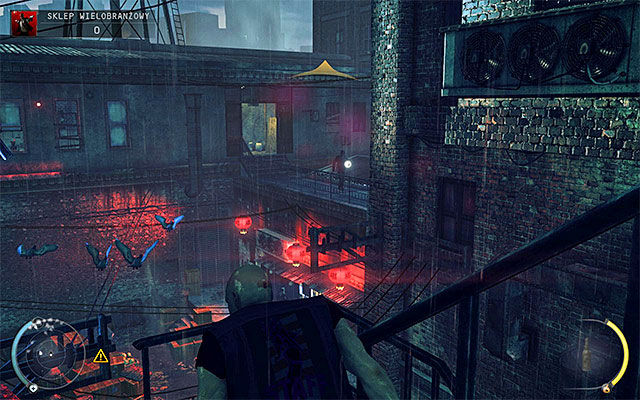
I first started to research different rooftop/NYC settings in gaming. I've found models and screenshots from several games such as Hitman, Max Payne and Mirror's Edge. I've also found some 3D models other people have created, I've included them here as I drew inspiration for my own models from them.
Even though not all of the settings have been proven to be of NYC they still provide necessary dtails that I could have skipped otherwise such as ventilation or random debris that is usually unnoticed.


Research In Real Life:
In order to observe different parts of NYC I've researched several images of NYC online. I was specifically looking for more worn down areas with graffiti and various other acts of vandalism. Not every image is confirmed to be of NYC however they still provide a setting in which a worn down area with a rooftop is presented.
I also needed to research different objects found on NYC rooftops such as water towers or ventilation so I gathered several images of those too.


Primary Source Research:
I knew that I wanted one of the buildings in my scene to be in the process of being built. I also knew that a building was being built near me and so I've taken several images of that building in order to use them as inspiration for the building that I'm going to model.
The images themselves are only of one side as the other side of the building was completely inaccessible but I did manage to get several shots of the scaffolding, the crane that was in the backgrou (behind the building) and the building itself whih was coincidentally made of brick (brick being a very common texture used when creating an NYC setting)
For my final task I've been asked to create a 3D setting of NYC rooftops which would be later used to create a real-time enviroment in Unity.
This is the showreel presenting the final outcome :
For my final task I've been asked to create a 3D setting of NYC rooftops which would be later used to create a real-time enviroment in Unity, Here is how it was made :
Creating the first shapes + first details:
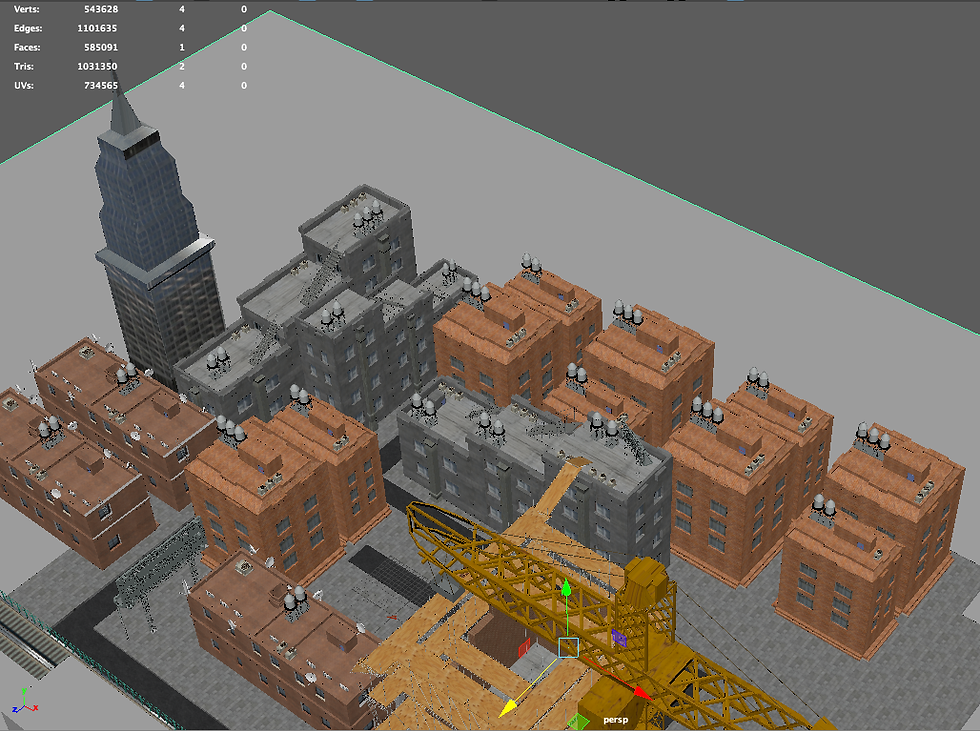
To begin creating the basic shapes for the first buildings I've used the "Polygon Cube" tool.
I made sure that all of the cubes are subdivided by 5 in all categories.
I then resized the cubes in order to create the different sizes of the buildings.
I began to work on the first building by "Extruding" the faces to create the ridge on the top of the building.
I also "Extruded" out a chimney and added some extra polygons using the "Insert edge loop" feature.
I added more polygons to add some detail, when "Extruding", to the chimney and to the ridge on the top of the building.


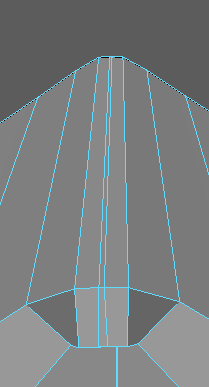
'Pyramid' roof window:
I have created a new shape as for this object I wanted to create a "Pyramid Roof Window".
I began by subdividing a plane using the setting shown. I started to " extrude the shape of the pyramid window.
The process of extruding is somewhat difficult to describe step-by-step however in all of these images I've "Extruded" the selected faces outwards. In order to join the side "extrusions" together I've selected the outermost faces and used the "Bridge" tool to connect them together.
The tool defaults to subdividing the "bridge" several times creating many unnecessary polygons, in order to not overload maya with too many polygons I've decreased the amount of subdivisions to 1.
I've used "Bridge" several times in order to connect everything together.
Ive also added two arcs at the endings of the windows to create some more detail, this was done by extruding the arcs simultaneously.


Side Ventilation Duct:
As a quick addition to the building I've decided to create a ventilation duct that would be placed on the side of the building.
I began by making a long and thin rectangle shape and placing it next to the building.
I then began "Extruding" the shape of the duct by constantly "Extruding" outwards and changing the angle ever so slightly.
When the shape of the duct was finished I "Extruded" back into the duct to create the air tunnel that goes through the duct.


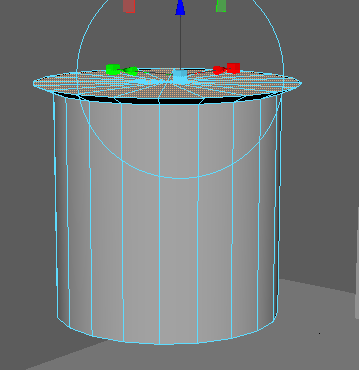
Satellite Dish:
I started out by creating a simple cylindrical shape by using the "Polygon Cylinder" tool. I then resized the cylinder to be much smaller and thinner.
I then began to "Extrude" the basic shape of the dish. To be absolutely honest, the shape of the dish was quite difficult to achieve and the final shape I created completely by accident but nevertheless it looked like a satellite dish so I moved on.
I then began work on the 'leg' the satellite would stand on. I created a basic cube and subdivided it by 3 in all areas. I then began to "Extrude" the shape of the dish stand. I made sure to "Extrude" the stand at an angle as most of the reference images of a satellite dish did not have a right-angle stand.
In the meanwhile I also added 4 small "Extrusions" to the dish as most sattelite dishes have 4 nuts on the front.
Lastly, I've began working on a new shape that would be the ''lnb'' (Low-noise block downconverter). By "Extruding" out the basic shape I was able to create the shape that I was happy with.
In order to ocnnect all of the shapes I've created together I used the "Combine" feature. One of the problems with the feature is that every time its used it off-sets the pivot and it has to be re-centered again.
After the completion of the satellite dish I've placed severall in different sizes and angles on the building that I was working on.


Water Tower #1:
I began by creating several shapes that resembled water towers. This was done by creating a basic cylinder and then "Extruding" the shape out. I wanted to have more than one design in front of me so I could then pick out the best looking one or even combine them.
When I decided on the shape I wanted to use I began creating the poles that would hold the water tower up. Once again this was done with a series of several "Extrusions". I then duplicated the pole and placed all 4 poles on a plane. That was the base of the tower.
I created a simple cross shape my resizing two rectangles and angling them to cross each other. I then placed the cross in between two poles and proceeded to duplicate the crosses until all 4 sides were covered.
I "Extruded" a small extention on the top of the tower and then proceeded to combine all of the pieces together.
I wanted to create a ladder so I began by creating a square shape, I created the square by taking 4 individual poles and connecting them together, and then I duplicated the square upwards. This created the shape of the ladder.
I wanted the ladder to have special extensions that would allow it to hook onto the tower so I began "Extruding" several faces simultaneously to first create a right-angled "Extrusion" and then to extend those "Extrusions" to create the pieces that would be connected to the tower.
Finally, I connected the ladder to the tower and used the "Combine" feature to finalize the object.
I was not completely happy with how this tower turned out and therefore decided to have a second attempt.


In order to create a smooth bend in the "Bridge" I needed to select Curve Type : Blend
I changed the subdivision count to 10 in order to not create too many unnecessary polygons


Planning:
Knowing full well that planning out the layout of my scene is very important I began mapping out what the area would look like in my notebook. Each note is followed by a cleaner version created digitally to show the reader a clearer image.
The first note simply presents the layout of the playable area and how I wanted it to look.
The next two notes were created to plan out the surrounding area, I created two different versions as I was not sure what aspects I was going to stick with.
Lastly, I was informed that when the scene is exported into 'Unity' there will have to be some way of stopping the player from escaping the intended enviroment. With that I began sketching out ideas with each presenting a different way of stopping a player from exiting the area.
The notes are all annotated with nicknames I gave each specific area.


Texturing the Water Tower:
In order to texture the fence on the water tower I first selected all of the outer faces of the fence and then assigned a new "Lambert" material to them. I then changed the Lambert material to read from a file which was an image of one link from a chain link fence and made it repeat several times to create an illusion of a whole fence. Because the fence was cylindrical I've had to change the projection to "Cylindrical" under the UV menu in order for the texture to look correct. The texture itself has a transparent layer and Maya recognises that allowing me to see through the see-through parts of the texture when rendering.
I've also textured the main part of the water tower by applying a cylindrical texture of metal to the outer faces of the tower's 'body'.


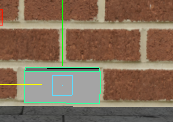
Last Minor Details on Building #1:
I began by adding windows to the building.I created more polygons using "Insert Edge Loop" and then "Extruded" those faces inwards, creating a window-shaped bevel. I created windows on all sides of the building. I also "Extruded" a ring that went all the way around the building.
I began working on a side ladder that I wanted to add to my building. I duplicated the ladder that I've created earlier and then stacked another one on top of it to make it longer. The ladder was clipping through the outer ring that I've extruded out earlier and so I made a cut in the ring by first creating a new face using "Insert Edge Loop" and then selecting the face I created and deleting it. I then re-sealed the hole in the building by selecting the two edges that made the hole and using "Bridge". To move bring the ring closer to the ladder I've "Extruded" the two faces that were next to the ladder. I then Began connecting the ladder to the rooftop, to do so I "Extruded" the top of the tower several times in order to create two 'hooks' that would make sure the ladder is holding on.
Lastly I began working on the entrance to the building. I extruded a step and then another step to elevate the entrance above-ground. I created the polygon for the entrance by using "Insert Edge Loop". I then proceeded to "Extrude" the entrance in-wards. The reason I created this detail is because I was considering A first-person perspective render of the area from a person who just left that building.


Working on creating more buildings:
As of now the only building that is present in the scene is building #1. There are also three buildings that do not have any detail at all and so I wanted to begin work on detailing them.
I created a pillar that would be duplicated and connected to the three buildings in a pattern. I also created several "Extrusions" including windows to make the buildings more aesthetically pleasing.
I have also began working on the basic shape of the building in process. I began by creating a hollow rectangle and then subdivided it. The subdivisions allowed me to individually raise parts of the building by "Extruding" them. This shows that the building is in the process of being built and some parts are more built than others.
Building a billboard:
I wanted to create a billboard and add it to my setting. First I duplicated the pole from water tower #2 and used it to create the base for this billboard. I also "Extruded" into a rectangle shape to create a bevel that would represent where the advertisement is placed. I joined the two pieces together and "Combined" them.
I then began working on the ledge that is put in place so that a person can walk alongside the billboard to insert the advertisement. I selected the bottom edge of the billboard plane and "Extruded" it outwards. I then selected the newly created edge and "Extruded" it upwards to create a small fence. I also "Extruded" some of the fence inwards to give it some thickness.
Every billboard image I saw on the internet had small lights on the top of the billboard in order to light it up at night and therefore I created my own small lights. I created a small square object and began to shape it by "Extruding" it several times. One part of the light had to have a bend so in order to get the best bend possible I used "Bridge" with "Blend" selected and connected two parts of the lamp together. After finishing the light I duplicated it several times and placed it on the top of the billboard.
In order to make the back of the billboard more 'stable' I duplicated the pole used earlier and created a design that looks similar to the back of a billboard. Lastly, I place a ladder onto the billboard and "Combined" all of the objects together.


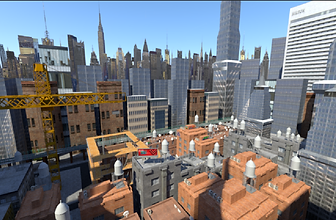
First Render:
I created this render to get a feel as to where and how far I was. This showed me that The empty space in the middle of the buildings really stood out and that there are not enough buildings just yet.
The first things I wanted to add were :
a skyscraper/tall building
scaffolding and crane
a road of some sorts
To make the sene look more aesthetically pleasing I would need to also start looking into texturing every object in the scene. I also need to think of a way to connect the buildings.
Scaffolding:
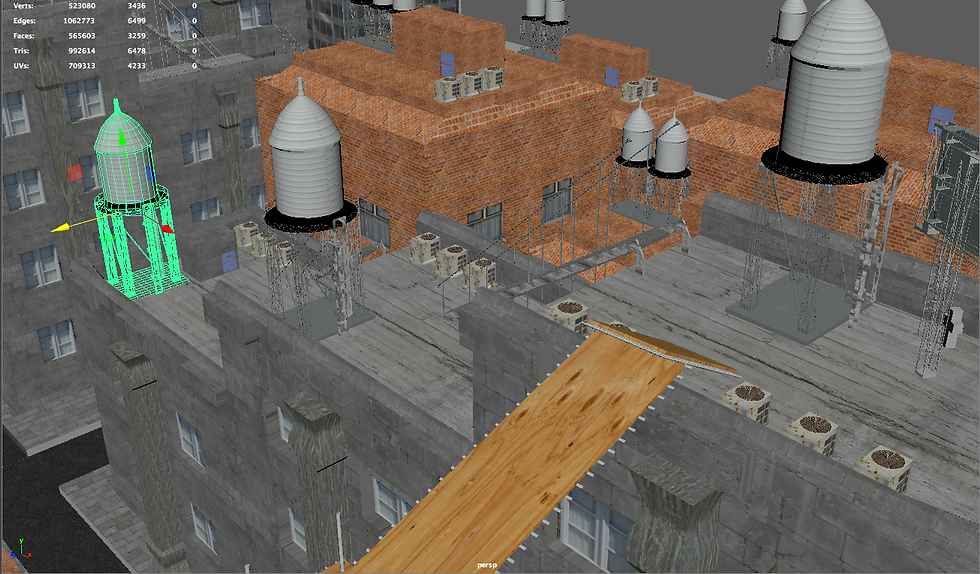
I began by creating a cylinder, I textured the cylinder with a metal bar texture so that when I duplicate it I do not have to worry about texturing each individual bar in the future, I started to duplicate the cylinder and placed them around the building. I then created a plane that would be the wooden boards that allow the people to walk along the scaffolding. I textured it with a wooden plank texture, this is because when duplicating I would've had to texture each individual board. After that I began to duplicate the boards and place them around the building making sure that they are all connected to the bars. I also placed the boards lower down the building to create different levels of scaffolding.
I noticed that the planks weren't supported by anything and so using the bars I made earlier I've created a grid that would hold up the weight of someone walking on the scaffolding. I then proceeded to add the grid under every piece of scaffolding, even though it adds polygons I made sure that the bars are subdivided well enough to seem round from up close as the player would be able to walk up to the bars in the real-time enviroment. The bars of scaffolding are always connected by a bar angled so it connects the top and bottom of two bars, I've replicated that look using the bars that I already made. I also placed a brick texture on the building
I started to add different ladders all around the scaffolding to make the scene more realistic since as of now the 'builders' working on this building would have no way to get up the scaffolding. I also added some of the wooden boards to other buildings as the builders would probably quickly move from rooftop to rooftop, this also allowed me to create a pathway for the player in the real-time enviroment to get up onto the scaffolding.
To make the scene slightly more believeable I created a small plane and added a teture of a safety warning that is normally found on a building site. I then duplicated that plane and placed it around the scaffolding.


Working on creating more buildings, Part 2:
In the previous render there were two objects which had no detail at all in them, these two objects are going to be twin flats that look very similar but one will be smaller. To add detail I used a combination of "Extrude" and "Insert Edge Loop".
I also began placing water towers on the buildings as the water tower was completely textured.
Thinking about the tall building idea I had before, I've created two designs for the building and settled on one which would be placed behind the triple-flat.
I duplicated the billboard I created earlier and placed the new one on the tallest building of the triple-flat, I also began to do some texturing work on the buildings.


Building a road:
I wanted to create a road to add more detail to the scene. In order to find a suitable area to place the road I first had to move some of the buildings apart.
To create the road I used "Insert Edge Loop" to mark out individual polygons and then I "Extruded" those newly made polygons downwards creating a road. After "Extruding" the road I placed a texture of asphalt onto it and resized it to fit.
I noticed that the 'pavement' around the roads looked very bland and so I put a texture onto it too, when looking for the texture of the pavement I made sure to look for the pavement used in NYC to make my model more genuine. I did not spend any more time on the floor as the focus of the project is the rooftops.
Creating a crane for the building site:
To create a more genuine enviroment I have chosen to create a crane that would be situated next to the building.
I began by creating a base, hte base of the crane is made out of the previously created "Water Tower Pole". I modified it by making it shorter and more wide and then I applied a texture of a metal that's been painted yellow, a common colour for cranes. The reason I applied the texture so early is so that when I start duplicating the object the texture will also get duplicated saving me the effort of texturing each individual piece.
I proceeded to duplicate the base several times creating the 'leg' of the crane and began working on the crane's 'arm'. I created a plane an dtextured it, using hte plane as a starting point I started to "Extrude" the extensions that would make the 'arm'. It proved ot be quite difficult as the crane's shape is very specific however with the combination of "Bridge" I was able to create a shape which looks like a crane 'arm'. After duplicating the shape I then began working on the support beams. I created a cross-shaped object and duplicated it several times but not before making sure that it is textured.
To create the hook of the crane I first created 4 connecitons that would be the ones holding the hook and the container that is hooked onto it, because the crane is so far away I did not focus on making the connections round, however I did texture them with a texture of rope. I then created a hollow square shaped container and textured it with a texture of metal. I connected all of the pieces together and joined them onto the crane. There was no need to model the crane's actual hook because from the perspective of the camera the hook would never be seen.
To create the top part of the crane I started to "Extrude" a wireframe of a box on the top of the crane, I then added the support beams I created earlier to the space that was in-between the wireframe. I also extended the 'arm' of the crane backwards and made sure that support beams are in place too.
I then created the area in which the crane would be operated, to do so I simply "Extruded" one part of the main body and then textured that. I made sure that the cabin has a window to make it more genuine. I also created the back part of the crane's 'arm' by "Extruding" and "Bridging" the already existing polygons. Lastly, I duplicated the wire/rope from earlier and connected it to both the front and back of the crane's 'arm'
The crane's bottom area could be worked on but for the moment the crane is finished. I also believe that from the perspective of the rooftops the bottom of the crane will not be visible.


Creating a train track :
I wanted to create a train track that passes through the side of the scene in order to make it more genuine.
I began by creating the support beams that will hold up the tracks, I created a simple cube and began "Extruding" it outwards to create an upside-down L shape, I duplicated it in order to see what the shape would look like when grouped together. I then began to texture the shape, I started texturing early in order to make duplication easier in the future.
I then created a simple plane on which the train track texture would be placed, I made the plane thicker and "Extruded" its sides upwards to create a shape that resembles train tracks from the side. After completing the shape I began to place a texture on the tracks, I used an image of train tracks on the non-"Extruded" plane and a texture of shining metal on the sides of the train tracks. I then proceeded to duplicate the train tracks several times to see if they are missing something.
I decided that the train tracks should have a fence around them, I began creating the fence by "Extruding" a cube into a pole with a thick base, I then put a texture of rusted metal with paint on it. Once again I put the texture on quite early as it would result in not having to texture each pole after finishing the modelling. I then duplicated the pole and moved the duplicate away from the original to create the fence, I then created a cylinder with not so many polygons (as it would not be seen up-close) that would serve as the bars that connect the poles in the fence. I textured the cylindrical object with the same texture as used in the poles but with the UV setting ow "Cylindrical". I then set the bar at a 90° angle and duplicated it. I set both of the objects in-between the two poles to create one piece of the fence. I duplicated the piece several times to create a linking fence that would be situated at the side of the train tracks. I duplicated the fence and copied it onto the other side of the train track in order for the tracks to be symmetrical.
Lastly, I duplicated the whole train track so that it would pass through the scene.


Creating a more genuine enviroment, Part 1:
To make the scene more believeable I decided to place some loose bricks onto the scaffolding.
To create the brick I resized a cube into the shape of a brick whilst using the brick texture on the wall of the building as a reference for size, I then textured the brick using a single brick texture I've found online.
I duplicated the brick several times and placed the duplicates on top of each other and placed them similarly to how a new pallet of bricks would be placed. I took some of the bricks out to make the scene more realstic.
I then duplicated the 'pallet' and moved the duplicate to the top floor. This time I took out more bricks to make sure that it is not exactly the same as the previous. In the real-time enviroment I wish tom kae the player able to interact with the bricks (being able to knock them over/move them)
Creating a flight of stairs:
The triple-flat building had no way of connecting each part of the rooftop together, in order to fix that problem I needed to create a staircase that would connect each floor together. I believe this was the most difficult task so far.
I began by creating a plane and then resizing it to resemble a step, I then made the plane thicker and textured it with a texture of metal. I duplicated the step and moved the duplication slightly upwards and slightly to the right, each duplication after would follow the same movement creating a floating staircase.
I then began creating the hand-rail. I created a pole by "Extruding" a cube, I created a thick base for the pole and then textured it with the texture of shining metal I used on the train tracks. I duplicated the pole and resized it to fit with the elevation of the steps. I placed the poles next to the stairs making sure that they dont actually merge into them. I then created another duplicate of the pole but this time it would be the actual rail of the staircase. I placed the new duplicate at an angle that closely resembles the angle of the steps' elevation and placed it on the top of the poles created earlier.
I then began work on the side panels that would be placed on the railing, I began with a simple rectangular shape and textured it straight away to avoid extra work further on in the future. I then experimented with the way the panels would be placed, I first tried out panels that would follow a 90° angle and would simply be duplicated to resemble a ladder shape but I did not think that design would look good so I decied to resize the panel and place it at an angle just like the railing. This design looked much better and so I decided to stick with it. I also duplicated the plank and placed it at a 90° angle on the very bottom of the stairs.
I then needed some sort of way for the stairs to be connected to the building and so I decided to "Extrude" out a shape that resembled a hook that connected the stairs to the building. The new "Extrusions" needed to be textured too and so I textured them with the same texture of metal that I used on the plank created earlier.
Lastly I duplicated that side of the staircase onto the other side to complete the design, I then duplicated the whole staircase and resized it accordingly to connect all three rooftops together.


Texturing the Triple-Flat building:
To continue the texturing process I've decided to texture the triple-flat building using a more gray colour scheme as not all of NYC's buildings use red bricks.
I found a texture of cinder bricks and placed it on all of the sides of the buildings making sure that each side uses the correct orientation (X,Z and Y). I then began texturing the pillars with a concrete texture. To make the building more realistic I used a texture of a window on each of the "Extrusions" and resized it to fit the shape. I also placed a texture of concrete on the rooftop. The building also had windows that were placed on the rooftop and for those windows I've used a different texture to differentiate the window type.
In the meanwhile I placed a texture of galvanized metal on the billboard, the reason for using a texture of Galvanized Metal is because that type of metal is coated with a layer of zinc preventing rust from forming. This creates a layer of realism as billboards are created to withstand rain and the rust that it would create.


Water Tower #2:
I wanted to salvage what I could from the previous tower and so I duplicated the tower's base. I noticed that most towers have 'legs' that look like miniature versions of the base of the tower I made and so I resized the base to be more thin and slightly longer by using the "Resize Tool".
I duplicated the earlier design of the tower with the rounded base and started to add a ledge by "Extruding" a line of edges. After "Extruding" the edges out I created a 90° angle by selecting the outer edge that I just created and then "Extruding" it upwards. I then wanted to make an opening in the 'fence and so I selected one of the faces and then removed it.
To create the tower base I've duplicated the thinned out version of the previous tower's base four times and placed it on a base that I've created using the "Polygon Cube" tool. I then connected the two pieces of the tower by using the "Combine" feature.
I duplicated the ladder that I've created for the other tower and began positioning it so that it firts the new tower, in the meanwhile I've also began working on a cross-shaped connection between the poles on the base of the tower. I did not like the aesthetic of the cross-shape and so I've created a single object that was thinner and placed it where the cross-shape would be. After completing all four sides I used "Combine" to make everything into one object.
I wanted to make the ladder more realstic, I've found that the ladder I've created would not be very safe at the height of the water tower and most of the ladders that I've found online had a ring-shaped outer layer that was there so the person using the ladder would not fall off. I wanted to replicate that on the ladder that I've created and so I began by selecting the faces on the 90° angles that were used to connect the ladder to the previous tower. I "Extruded" those faces out and then used "Bridge" to create a bend that would join them together. The "Bridge" that was created was not a bend and so I changed the properties of the "bridge" to Curve Type : Blend, I also changed the amount of division to reduce the polygon count as there was no need for 20 different subdivisions. I then started connecting all of the outer rings together and rounded the conections at the top by using "Bridge" once again.
I felt that the peak of the tower was too flat and so I "Extruded" a small point that would come out from the top of the tower.
I was much happier with how this tower turned out to be and chose it over the other tower that I've created.


#


Emergency Door:
To finish the designs of the buildings I had to create a door that would allow people to get inside of the building from the rooftop.
I began by creating a simple cube and then immediately resized it accordingly with the doorway already present on one of the rooftops. I "Extruded" out a special door handle as the door I was creating was planned to be an emergency door. The door handles on emergency doors are quite wide and cover the whole side of the door they are connected to.
After "Extruding" the handle out I then textured the door with a texture of blue metal and I textured the door handle with a texture of red plastic. I realised that the door I was creating was missing a sign that stated that it was an emergency door and so I created a small plane that would act as the sign. I placed the plane on the door and then textured it with a sign that I found on the internet that said "Fire Exit" and had a symbol of a man leaving through a door.
After completing the emergency door I duplicated it and placed it on all of the rooftops that had an entranceway inside the building.


Populating the scene :
I wanted to populate my scene to make sure it looks authentic compared to NYC. Using my earlier plans as reference.
I began by duplicating the duo flat however to mkae sure the scene doesn't look very uninteresting I've swapped the positions of the two buildings every other time that I've duplicated them.
I continued to follow myearlier plans and I've duplicated each building respectively, I then began to create the area outside of the playable space. I first created a set of ''dummy'' buildings which were just boxes with a texture on them. These buildings did not need to be as detailed as my other buildings as they would not be seen from up close and would only be seen in the background. I also textured my skyscraper with a smiliar texture that I've used for one of the dummy buildings, I also used a texture of metal on parts of the skyscrapers that were not habitable.
A sense of scale:
To make sure that my scene is correctly scaled I've created a small caricature human that would serve as the scale to wchich I would adjust the size of my objects. To make sure the human is scaled correctly I've used the previousy created Emergency Door as a scale as doors are roughly the height of a human.
I then started to place the human all around my scene to make sure everything is roughly in scale, after cheking many objects I've found that most of them are correctly scaled however I've found that my water tower is too small by seeing that a human would not be able to fit onto the ladder attached to the tower. To fix this I've resized the tower making sure that the ladder was just big enough to fit a human, I then replaced the existing water towers that I've placed around the scene with the new resized water tower which was almost twice as big. I've chosen to not resize the towers that would not be seen from up close as that allowed me to place more than one per building.


Populating the scene, Part 2 :
To continue creating a more realistic setting for my scene I've once again began to populate te area with dummy buildings.
I've duplicated the set of dummy buildings I've created earlier and placed the duplicates on the other side of the scene, I then duplicated the skyscraper several times and placed it around the playable area, I also resized two of the duplicates and created taller versions which I then placed on two opposite sides of the scene, far outside of the playable area. Next to one of the tall skyscrapers I've created a large and wide dummy building and then proceeded to also texture that.
I then wanted to populate the area with a larger variety of dummy buildings and so I created two more buildings which would serve as flats that would not be sseen from up close. I textured both wth a texture of two different flats and placed them on both sides of the scene.
I started to duplicate even more of the dummy buildings and placing them on the sides of the scene in order to complete a 'box' however this time changing their positions and sizes whilst doing so in order for the scene to not look too repetitive. In the end I've created a layer of buildings that surrounded the playable area but were not seen from up close.


Creating a ''Skybox'':
In order for my scene to appear larger than it really is I needed to create a ''Skybox'' around my scene.
I've first found a suitable image of the NYC skyline for my skybox and began to mask the background with a transparent layer using the same techniques described in Part 1 of Unit 1. I did not like the first two images that I've found and so I settled on a third image. I once again masked the background with a transparent layer. The reason for having a transparent layer instead of a sky is because the render engine 'mental ray' is set to create a sun and sky and so the two aspects would clash and break the realism of the scene.
I created a large plane on which I would place the image of the skyline and I began to place it on the outskirts of the scene. To create a more detailed setting I've duplicated the plane and layered one behind the other. After layering one part of the skybox I then duplicated the layers and moved them to all sides of the scene in order complete the 'box'.
I've noticed that when rendering the colour of the skybox's buildings did not match the time of day that was rendered using mental ray, first I tried to change the time of day by rotating the direction of the sun downwards however I was not able to replicate the colour casted on the skybox and so I once again opened the skybox in photoshop and changed its hue to have less orange in the image. The process of removing orange from the image was very similar to the process of removing parts of a green screen when chroma keying does not remove all of the background. I exported the image on the same file that was used to texture the planes because maya would then adapt and use the newer texture without me having to change the directory of the texture.
Finally I adjusted the skybox slightly so that it faces the player in all directions as it is important that the scene looks real.


NYC is not that clean:
Many of the images that I've found of NYC have a lot of graffiti sprayed onto the walls of the buildings, in order to create a more realistic scene I also needed to add graffiti to my scene.
I began by finding several different images of graffiti online and then masking the backround of each, I also created my own custom graffiti that said "West Thames College" to add some authenticity to my scene. In order to place the graffiti onto the walls of the scene I created small planes, similar to the skybox, and placed them on top of the walls of the area I wanted to add graffiti to. I then proceeded to place the images of the graffiti on the planes making sure that the grafitti images do not repeat too many times as that would ruin the realism of the scene.
I placed the graffiti on several of the buildings and I've also placed it on the billboards as anyone can climb up them.
This concluded the creation process of my scene and it was time to begin rendering final images that would represent what my scene is.


For this image I've placed the camera in a similar way to the original photo.
Both of the photos feature easily recognizeable buildings which both show that they are habitable however the real-life image appears busier and livelier than the render as more objects like wires, cars and various other things add to the realism of the scene. In the future if I wanted to improve my work I would add these to the scene.
I could not get the exact same angle that the photograph shows but I've placed the camera in a similar fashion.
I believe that with the addition of pedestrians and objects like cars my scene would be close to being as realistic as the photo, I've managed to capture one of the graffiti images adding a similarity to the photograph. If I were to improve this scene in the future I would add more "Extrusions" to the buildings and add more objects.
The angle of my render Is similar to the photo however I've also managed to capture a part of the scaffolding which I believe adds more detail to the scene. Both images show habitable areas however once again the photograph shows that adding more objects creates a more realistic atmosphere. If I were to improve this scene in the future I would add more objects to the scene and use textures which make the buildings look more worn-out.
I've tried to capture a similar scene to the photograph but using my triple building instead of three different ones. I believe I was able to capture the feeling of the photograph well however the area presented in the photograph looks more worn-out than in my render, some of the shops have damaged signs and the bricks used are not all the same colour. If I were to improve this scene in the future I would add some damage to the building with textures.
I did not have a building that had a billboard attached to it but I tried my best at replicating the photo.
It is easily recognizeable that my render seems too 'clean' compared to the photograph. The building and billboard seem more worn-out and there is foliage all around it. If I were to improve this scene in the future I would use a more damaged texure for my billboard and I would look into adding foliage around my existing buildings.
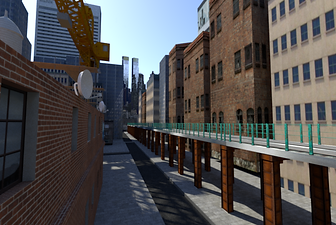
Whilst replicating the photograph I was able to capture the railway and crane which I believe makes the image livlier.
I believe I captured the essence of the photograph well however my scene is missing the foliage seen around the buildings and objects like cars. There are also different markings on the roads that are missing from my scene. If I were to improve this scene in the future I would add the things mentioned earlier to capture realism.
Both images feature a view similar to that of the view from a helicopter however the photograph seems much larger than my scene. One major difference between the two images is that the photograph is zoomed out much more displaying a bigger scene than my render, I was also not able to move the camera higher as the dummy buildings are not fully textured. If I were to improve this scene in the future I would fully texture the buildings and add more.
I was able to replicate the photograph as one of my buildings is very similar to the one shown in the photograph. The photograph shows a more high-class area but it also shows foliage which is missing from my scene. The photo also shows a fence that would prevent an accident, something that is missing from my building. If I were to improve this scene in the future I would add foliage to the scene and I would add a fence to the rooftop of at least one building.
Recreations of real-life photographs using my scene and rendering:


PART 4
Air Conditioning Unit:
I wanted to create an air conditionng unit as many of those are seen around the rooftops of NYC.
To begin I created a simple cube and began to resize it to set the basic shape for the unit. In order to add a fan into the unit I first needed to create a space where the fan would go and so using "Booleans" I was able to cut out the shape of a cylinder inside of the unit. I then began to "Extrude" out the base of the unit, making sure that the base is wider than the main body.
To create a fan blade I first cut out the triangular polygons created when creating a cylinder. I then patched up the sides using "Bridge" making sure that no divisions are created in the meanwhile. I then resized the blade making it longer and thinner. I started placing the fan blade inside the newly created hole but first I made sure to texture the fan blade so duplication will be easier in the future. I chose to use a very rusty metal texture for the fan blade as the position of the fan would result in a lot of water hitting it and seeing how the area of NYC I am creating my enviroment after is quite old I thought it would be fitting to have the blades also be old and rusty.
To create the fan I first had to create a central pivot that the fan would revolve around. After creating a cylinder I resized it to fit with the scale of the fan blade and positioned it to be right in the middle of the space. I used a similar texture of rusted metal on the central pivot as it would also be rusted and then I began to duplicate the fan blade. After duplicating the fan blade once Maya copies the way the duplication was moved and each following duplication automatically follows that pattern. Using that feature I was able to quickly create a set of fan blades that all resolved around the central pivot.
Since I made the fans of the unit be really rusty I decided to make all of the unit have signs of rust too. I've found a texture of metal that was painted white but had rusted over time and used that texture on all sides of the unit. To create the grates that would be placed on the sides of the unit I created two planes and placed them on both sides of the unit. To texture the planes I first had to find an image of a grate, I then edited out the parts that had existent white metal on them and made them transparent so that when textured It would be see-through and the texture behind (the rusted white metal) would be seen. I then placed the newly made texture onto the two planes and resized the UV accordingly.
I've noticed that the fan was uncovered and allowed anyone to reach into the unit and so I decided to make a grid that would exist to stop anyone from placing their hands into the unit. I created a cylindrical shape and textured it with the same texture I used for the central pivot. After that I duplicated the shape several times to create the grid.
I created a small "Extrusion" on the side of the unit that would act as a fail-safe switch for when the main grates stopped the flow of air. After that the unit was finished and I began placing it all around the playable area.


I've tried to replicate this photograph using my train tracks instead of a pathway. I was able to show habitable areas in the background just like in the photo however the photo features fire escape stairs, something which is missing from my scene entirely and would need to be created from scratch. If I were to improve this scene in the future I would create fire escape stairs and attach them to each building in my scene as they are necessary for realism.
I've tried to replicate the photograph going to the extent of making the image black and white however I was unable to replicate the fog present in the background of the photo. The photograph seems much livelier compared to the render as misc. objects and people are present in the photograph. If I were to improve this scene in the future I would add a fog to my scene as not everything can be seen infinitely, this would also increase the scale of my scene.
I was not able to fully replicate the photograph but I tried to showcase obth flats and skyscrapers in the background. I was able to capture water towers that are also present in the photograph but with the addition of some of the scaffolding present in the building site. The scene in the photograph includes foliage making it more livelier than my render. If I were to improve this scene in the future I would add foliage to the scene to make it more realistic.
The photograph to the right features a large amount of water towers and so I've tried to replicate that scene in my render. I was not able to replicate the present fog and this subtracted from the realism of my scene ocmpared to the photograph however I was able to capture the large quantity of water towers present in NYC. If I were to improve this scene in the future I would add a fog to the background in order to make the scene more realstic.
As the photograph shows a close-up of a fence I chose to render my scene right beside the train track fence. I was not able to capture the water tower present in the original photograph but I was able to capture the buildings in the background. There is also a fog present that I was not able to replicate. If I were to improve this scene I would implement a fog in the background to create a more realistic setting and add a bigger sense of scale.


I've attempted to recreate the scene seen on the photograph but found a big flaw in my scene in the meanwhile. The photograph shows a much more worn-down version of the support beams compared to my scene where they look undamaged, what is missing in my scene is a texture under the tracks as there is nothing there and it looks unnatural. If I were to improve this scene in the future I would add a texture to the train tracks and expand the support beams
Evaluation:
Overall I believe that I've represented a part of NYC well, I was able to capture the large amounts of water towers and air conditioning units present on the rooftops and the overall aesthetic of the area presents a habitable area. I believe that the area I've created presents a scene where the area is smaller than the surrounding elements would leave the viewer to believe, the elements being the skybox and dummy buildings.
I was able to create a believeable billboard and replicated the large amount of graffiti present in NYC, especially the areas my work was based on however I was missing many elements that would have made my scene more believeable. One of the things missing were objects such as cars or containers that would've belonged to the people living in the area presented. I was also missing any signs of foliage that would've created a more lively setting. In a lot of the photographs there is a fog present in the background and I was not able to replicate that into my own scene. If I were to improve this project in the future I would create a more lively but believeable enviroment by adding people, cars and possibly litter and misc. objects that would add realism to the scene. I would also attempt to add more enviromental features such as the previously mentioned foliage and possibly a fog that would add a larger sense of scale to my project.
Extension Task:
Further compare the black and white render to the photograph it was based on.


-
Fire escapes visible in photograph, missing from my render
-
Protective fence present in my render but missing from the photo (there is a fence in the middle of the rail)
-
Fog (presumably created by earth's atmosphere) captured by the camera but not implemented into my render
-
Both rail tracks supported by beams adds realism to my render
-
Graffiti visible on my render but missing from photograph as it was taken when graffiti was not as popular
-
Buildings visible in the background presenting a larger scale. Similar to the photograph where there are visible buildings in the background.
-
Human interaction missing from my render, no shops or any actual people which are all present in the photograph.
-
The train tracks are three-dimensional objects in the photograph whereas my render presents them as a flat texture placed upon a plane. It also doesn't make much sense that gravel is present in between the tracks as the tracks are being supported above ground.
(click image for full size)