
Dawid Batog

A blog/portfolio documenting each unit of my work
UNIT 2 - Introduction to Research Skills in Art and Design
To begin looking at the structure of the human skull I began sketching a skull from observation using a model. I did 3 sketches from three different angles allowing myself only a limited amount of time. Arguably the last angle was not very good and it did not allow me to get a good sketch.


I was tasked to sketch a friend of mine whilst focusing the most on the nose. To achieve this I've sketched using a combination of 2B and HB pencils plus a rubber to create highlights. I've done two sketches, one is the front view and the other is the profile. For both sketches I was given 10 minutes for each one. What I found most difficult was getting the correct shading in place but I belive that I've managed to shade the nose somewhat decently in both sketches.


Trip to the V&A Museum:
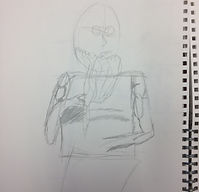
Whilst visiting the museum I was tasked with sketching 6 different figures whilst focusing on the Head, Torso and Legs.
Heads:
Torsos:
Legs:


I feel that the sketches of the heads were my best sketches out of the set however the representation of shading could use some work.
I feel like the torsos were my weakest link, I had difficulty showing the muscles that were present on the figures.


I believe that the sketches of the legs were a bit disproportionate, especially the second sketch.


To begin creating a 3D model of a head I first must have a clear idea of what I want to create, therefore we were given the task of creating our very own villain character. In this section I will describe my character and hopefully get an idea as to what he will look like.
To begin, I want my villain to be a 'mafia boss' type of character.
Aged around 40-50 showing signs of aging and possibly tooth decay due to smoking.
Would most likely have a scar due to the fact that to become a mafia boss one must be strong and fight their way up.


As I am preparing to create a 3d model of a human head I must first identify and know the purpose of specific muscles and bones in the human face. For this reason I have found a picture of a male face and annotated it; highlighting each muscle and bone that I must take into account when creating a face.

As I began creating the model I was set on the idea that my villain would be what I described earlier however as I put more work into the model I slowly began to change my idea to a demonic being. I was mostly inspired by these images:


Creating the villain model is a big task that requires planning and some insight to the character that I am making and so I need to write a story that will describe the origin of this villain. Keep in mind that this story was written after the model as the origin of the model changed halfway-through.
He was a 40 year old 'businesman'. His business was killing, all of those who opposed and those who served him feared him. He was the boss of the biggest underground network of mafia in America however one day he retrieved a mysterious briefcase with soe strange artifact inside. This artifact was known to make people around it go mad but that did not scare him at all. Driven by his greedyness he opened the briefcase to unleash something he should have never seen. The artifact cursed him turning him into a devil-like being that was bound to kill anyone that tried to use the artifact for themselves. It didn't matter for him though, all that meant was that he got to kill more people which is exactly what he wanted.
To begin creating the 3D model of my villain's head I began by selecting the default head model that Mudbox provides.
I activated Mirror: X to make sure my model is symmetrical. I also Increased the polygon count by pressing Shift + D
I then used the "Sculpt" tool to create the bulbous shape of the nose. To adjust the size and strength of the tool I can hold B or M (respectively) and drag the mouse to change the values.
I then began adding wrinkles to the face by using the Reversed (holding ctrl) "Sculpt" tool and smoothing them out by holding Shift and clicking on them. To help me recognise where wrinkles are on the face I've used a stock image of an aged man.
To create the holes in the nose I used the reversed version of "Sculpt"
Here I began to add more and more detail to the face and begin sculpting the Nasal Bridge and the details of the Corrugator. Additionally I've also begun working on the area around the Orbicularis Oris. At this stage I've smoothened out the wrinkles that I’ve created. By using the "Knife" tool and the "Sculpt" tool I've refined the shape of the nose.
I also began working on the eyes, I sculpted the basic shape of the eyelids and the wrinkles around the Orbicularis Oculi. I also used a "Stamp" combined with the "Sculpt" tool to create the eyebrows.
Here I've begun sculpting the skull and inner bones of the model. To achieve this I've used a combination of the "Sculpt" tool, "Knife" tool and the "Flatten" tool. The "Flatten" tool allows me to flatten the selected polygons. This came in useful when sculpting the "Zygomatic Arch" and the "Temporal" area of the skull. I have used the "Freeze" tool to freeze the selected polygons in place and prevent any changes happening to them.
I then began working on the upper torso of the model. I've used the "Sculpt" tool to create more polygons to work on and then I used the "Grab" tool to stretch the neck of the model, as it was very stubby.
I began work on the Clavicle, Supraclavicular fossa major and the Adam's Apple (as the model is male).
To achieve this I've used the "Sculpt" tool and the reversed "Sculpt" tool to create the basic shapes and in-dents and then I smoothed it all out using the "Smooth" function (holding shift).
At this stage I just refined all of the existent features by using the combination of the "Knife", "Sculpt", "Flatten" and "Grab" tools.
This is also the last time my villain was planned to be a mafia boss hence this is the most human version.
 head 3 |  head 4 |  head 6 |
|---|---|---|
 head 8 |
After being inspired by the images of demons I began working on the horns that I would add to my model.
I first used the "Freeze" tool to make sure that the rest of the model was not changed. I then began creating the rough shape of the horns by using the "Sculpt" tool.
I finished the basic shape of the horns and rounded them off at the end. This was all done using the "Sculpt" tool however I used the "Relax" tool throughout the way, as the horns were very rigid.
As the images of demons all had very refined wrinkles all over their face I began adding more detail to the face by using the reversed "Sculpt" tool and the "Smooth" feature.
I was not happy with the lack of detail on the face so I began adding more wrinkles all over the facial region.
In the meanwhile using the "Grab" tool has allowed me to give the nose a more pointed look.
I also started to refine the clavicle to give it a sharper look.
At this stage I've began working more closely on the cheeks of the model.
I first began by smoothing everything out using the "Smooth" feature; I then began repeatedly using the "Sculpt" tool in combination with the "Smooth" feature to attempt to create an extra layer of skin and wrinkles.
At this stage I began adding more detail to the nose by using the "Knife" tool in combination with the "Smooth" feature.
I began to add texture to my model. To begin I've selected a "Stamp" that would suit the texture I was envisioning.
I then used the "Sculpt" tool with the maximum size and applied the texture.
Afterwards I used the "Freeze" tool in order to lock the head of the model in place and assure that no more changes were made to it.
The horns of the model were too smooth so in order to change it I chose another "Stamp" and selected the highest strength possible.
Then using the "Sculpt" tool I applied the stamp onto the horns.
I've begun working on the ears of the model. By using the "Sculpt" tool I was able to create the basic shape for the ear, the shape was inspired by a mix of Elvish and Imp ears. Using a reference image of an ear I've used the "Sculpt" tool and the reversed "Sculpt" tool with the addition of the "Smooth" feature to recreate the outer ear shape. After finishing modelling the ear I used the "Grab" tool to stretch out the "helix" to give the ear a more pointed look.
I then selected another "Stamp" and with the combination of the "Sculpt" tool I began adding a more leathery texture to the model.
I attempted at using the paint tool and giving my model some colour (seen in the last screenshot). This concluded the creation of my model.
The finished model can be viewed via sketchfab.
 head 11 |  head 13 real |  head 14 |
|---|---|---|
 head 19 |
 head 18 |  head 20 |  22 |
|---|---|---|
 head 23 |